Adjusting Bike Brakes: Easy And Complete Way You Should Know
Jane Tu - December 22, 2022
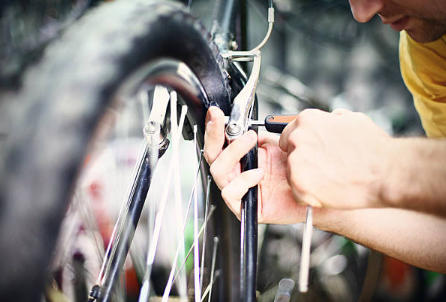
To adjust your bike brakes, you should check how tight or loose your brakes are, and pull the brake lever. Accordingly, tighten or loosen the barrel adjuster. To readjust, loosen the bolt on the brake caliper. brake cable through the caliper and then release it. The caliper bolt should be retightened. Examine your brake pads. Continue reading, you will learn more facts about adjusting bike brakes.
Table of Contents
What Do You Know About Bicycle Brake Systems?
Modern bicycles can be equipped with three primary brake systems: disc brake, caliper, or V-brake.
A cable is required to operate the caliper brakes. On road bikes, this type of brake is present.
In that they require cable action for activation, V-brakes are comparable to caliper brakes. For mountain bikers, especially those with suspension systems, these brakes are very popular.
Disc brakes function similarly to contemporary motorcycle and automobile brakes. The brake system is made up of a rotor (or caliper) and a piston that compresses the disc (or rotor) to slow down or stop the bike. On the hybrid, touring, off-road, and hybrid bikes, this braking system is an option.
What Tools Do You Need for Brake Adjusting?
Tools like a pair of pliers, a spanner, a ring wrench, and Allen keys will all be needed for this project.
You might require additional tools, depending on how your bike’s fasteners are designed. To improve the performance of threaded parts, some bikers also suggest anti-seize grease.
How to Adjust Bike Brakes?
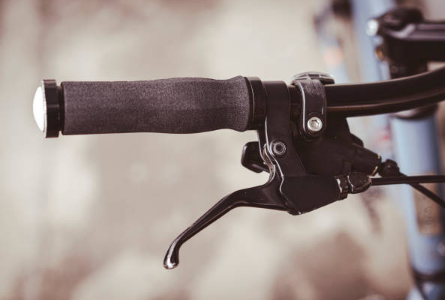
On cable-based brakes, such as v brakes and mechanical disk brakes, there are two main adjustment points. The barrel adjuster is the other, and one is at the caliper.
The caliper, which is connected to the brake pads on v brakes, is the horseshoe-shaped component over your tire. The caliper, which resembles a claw at the disk in the middle of your wheel, is used with mechanical disk brakes. The metal cuff that is attached to the brake cable at your brake lever is the barrel adjuster.
Your brake cable probably needs to be adjusted if you find that applying the brakes requires a lot of force or if they fit tightly into the handlebar.
Pull the Brake Lever to Judge How Tight Or Loose Your Brakes Are
The brake lever’s tightness or looseness is the most obvious sign that something is wrong with your brakes.
If the brake cable is too loose, the lever will touch the handlebars. The cable is too tight if you can only just barely squeeze it. The brake lever should squeeze for 3–4 cm before getting challenging.
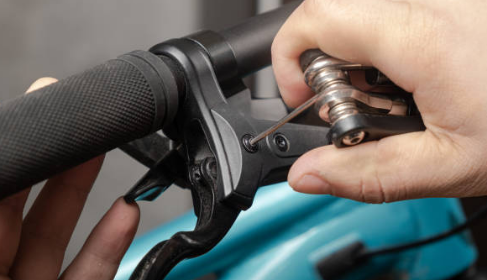
Tighten Or Loosen the Barrel Adjuster Accordingly
You can use the barrel adjuster to make small adjustments after determining whether your brake cable is too tight or too loose. The barrel adjuster can be adjusted by rotating it either clockwise or counterclockwise. This affects how tight or loose the cable’s tension is.
If you’re unsure, skip to 50 seconds in this video where it is demonstrated how to tighten or loosen the barrel adjuster.
Give the brake lever another squeeze to see if the problem has been resolved after you have adjusted the barrel adjuster accordingly.
Top tip: If you’re out on a ride, you can quickly and easily fix braking problems by tightening or loosening the barrel adjuster. Even if it doesn’t fix the issue, it might make things better for long enough for you to return home safely and fix it correctly.
Loosen the Bolt on the Brake Caliper to Readjust
After adjusting the barrel adjuster, the cable on the brake caliper might be too tight or loose if the brake lever is still too tight or loose.
With your Allen key, loosen the cable from the caliper while being careful not to completely unbolt it because if you do, you’ll have to put the brake back together. For a visual example, watch 1:25 to 1:33 of the aforementioned video.
Pull Or Release the Brake Cable through the Caliper
Once sufficiently loosened, the caliper bolt ought to spring back away from the wheel and cable. At this point, you can either pull the cable outward to tighten the brake or let it retract inward to loosen it.
Keep in mind that with v brakes, you want the brake pads to rest a few millimeters away from the rim rather than touching it.
When you apply the brakes, a lever on the caliper that houses the cable threads through it and moves. Disk brakes have this same mechanism. When you tighten the cable, check to make sure the lever still has space to move and can’t move too far back to collide with the caliper. The pads won’t be able to contact the rotor and your braking will be hindered if it does. To see an example of this, fast-forward to 1:11 in the video below.
Tighten the Caliper Bolt Back Up
Retighten the caliper bolt and squeeze the brake pedal once you’ve located the point where your brake pads are snugly affixed to the rim and the cable is snug.
Returning to the barrel adjuster to make any last-minute adjustments to loosen or tighten the brakes is worthwhile if they are still not quite right.
How to Adjust V Brake Pads?
For v brakes, adjusting your brake cable and brake pads simultaneously is necessary. You will eventually need to replace or adjust them, after all.
The time may be now if you can feel your brakes pulling while you’re riding, they screech loudly when you apply them, or they’re not even on both sides. Here’s what to do.
Check Your Brake Pads
When trying to identify a problem, brake pad wear is a good place to start because it’s one of the most frequent causes of misalignment and poor brake traction.
It’s time to buy new brake pads if the brake pad has worn unevenly or past the wear line.
Top tip: As any artificial colors in the rubber compound can result in that awful honking sound whenever you apply the brakes, we advise choosing brake pads that are either black or naturally colored.
Pull the Brake Lever to See Where Your Brakes Need Adjusting
As soon as your brakes are set up correctly, applying the brake lever will cause both brake pads to press evenly against the wheel rim.
The brake pads should be snug against the rim’s center, not touching the tire or extending past the lip. You want your brakes to make as much contact as possible with the wheel rim.
You can identify the source of the misalignment if one side of the brake squeezes more loosely than the other, overlaps the rim, or squeezes only slightly on one side.
Loosen the Bolts Holding the Brake Pads in Place
With an Allen key, loosen the bolt on the first brake pad once you’ve determined the area that needs adjusting. Loosen the opposite side as well since you might need to adjust both to fix the first.
It’s crucial to avoid losing them too much. If you do this, the bolts and washers will all fall to the ground and the pads will come loose from the holder. Simply loosen the bolt enough to allow the brake pad to be moved in the holder 5mm forwards and backward as well as slightly up and down. This ought to be sufficient to properly align your brakes.
Top tip: If you need new brake pads, you must completely wind out the old ones before installing the new ones. Just make an effort to recall the positioning of any washers and bolts on the stem so that you can duplicate it when securing new pads.
Move Your Brake Pads into the Correct Position
You can now change how close to the wheel your brakes are mounted. Close the space between the pads and rim if it was previously too open. If they were too snug, move them a little bit farther out from the rim than you had them.
Keep in mind to line up the pads with the arc of the wheel, making sure they sit flush and don’t rub against the tire or overlap on the inner edges of the rim.
Your brake pads should be a few millimeters away from the rim in the ideal situation. Your brakes will be more responsive when you pull the lever if there is less space between the brake pads and the rim. Before pulling the lever, make sure the pads are not actually in contact with the rim.
Tighten Your Brake Pad Bolts Back Up
Once you’re satisfied with how your pads are positioned, use the Allen key to retighten the bolts. As you tighten your brakes back up, take care not to pull them out of alignment.
Try to balance the amount of torque you’ve applied to the bolt on each side as well. This will guarantee that each brake pad is as responsive as the others and that both brake pads operate simultaneously and evenly.
How to Adjust Your Disk Brake Pads?
Disk brakes work similarly to v brakes in that when you apply the brakes, two pads squeeze against a moving part of the wheel to slow you down. This is the metal rotor or disk, that is located in the middle of your wheel when you have disk brakes.
Disk brake pads may deteriorate over time and misalign with the rotor. Worse still, worn brake pads can be hazardous and are harder to spot than those on v brakes, so it’s critical to maintain them occasionally. Here’s how.
Stand Your Bike Upside Down on a Flat Surface
Your brake rotor must be adjusted while the wheel is being spun. So, to get ready for that, you should stand the bike upside-down so that its handlebars and saddle are supported.
You could also buy a bike stand or ask a friend to simply lift the bike when it’s time to spin the wheel.
If you intend to perform your own maintenance in the future, a bike stand might be a good idea.
Check the Alignment of the Rotor
You should be able to see the rotor nestled between two brake pads in the space between them if you look down at your wheel. The caliper needs to be adjusted if the rotor has uneven spacing on either side.
It’s possible that from here, everything appears to be in order. However, occasionally damaged or bent rotors may not become apparent until the wheel is in motion. So, spin the wheel.
The rotor rotates with the wheel, so if it is bent, it should wiggle as it does so. The majority of the time, this indicates that you require a new rotor, but you can true the rotor using a unique tool that essentially lets you bend it back into shape.
If the wheel spins without experiencing any lateral movement, you have successfully corrected the rotor.
Loosen Your Disk Brake Bolts
You’ll need to realign the caliper if your rotor appears to be closer to one brake pad than the other. To fix this, you must first remove the bolts at the top and bottom of the caliper.
Keep in mind not to completely loosen them. You need just a little bit of slack in their fittings so that they can move around without coming apart.
Squeeze the Brake and Tighten the Bolts
The wheel should be spun after your brake caliper has become loose, and the brake lever should then be pulled firmly.
Both pads will align with one another as a result of the brake caliper’s grip on the rotor.
Retighten the bolts while the brake is still engaged.
Release the Brake Lever and Test
The brake lever ought to rest in the center of the two brake pads inside the caliper once you let go of the pedal. Although you should be able to see it, make sure there is no lateral movement by spinning the wheel to check.
In order to make smaller adjustments and move the caliper until they are evenly spaced, loosen one bolt at a time.
FAQs About Adjusting Bike Brakes
Why Are My Brakes Constantly Rubbing?
The calipers’ alignment is the primary cause, to be sure. The user must take action and correct the caliper alignment to prevent premature pad wear.
How Tight Should Bicycle Brakes Be?
The bicycle brake should be snug before it becomes difficult; the lever should squeeze 3–4 cm.
Why Do You Need to Change Brake Pads in Pairs?
The balance of the wheel’s braking power must be maintained.
What Are the Signs of a Wrong Brake Lever?
The squeaking or squealing sound is the most typical symptom, to be honest.
Can You Ride With a Stuck Brake Caliper?
The ride will be stressful and exhausting because the brakes are always applied.
Which Tools Are Required to Adjust the Rubbing of Bike Brakes?
The only tool necessary for adjustment is the Allen wrench.
Conclusion on Adjusting Bike Brakes
For the best performance, bike brakes need to be adjusted frequently. It’s critical to replace your bike brakes on a regular basis to keep them functioning at their best.