How To Clean Camelbak With Simple Ways
Russell Franklin - November 9, 2022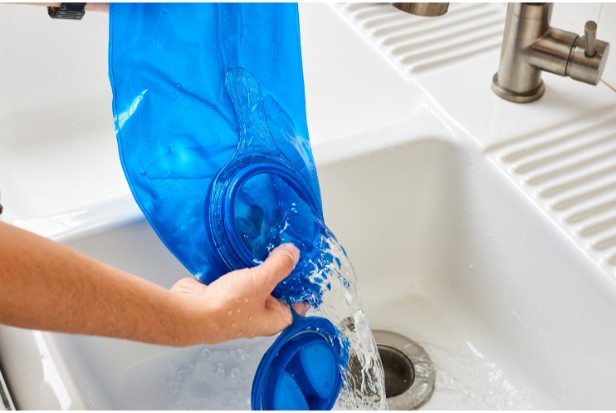
To make cleaning your Camelbak as easy as possible, we put together this guide.
It’s crucial to understand how to clean a Camelbak or any other similar hydration reservoir because water is a crucial component of any outdoor activity. Rinsing, deep cleaning, and disinfecting are the three main approaches.
Table of Contents
Prior To Use, How Should A Camelbak Be Cleaned?
Follow these steps:
1. Warm water and mild soap should fill the reservoir halfway.
2. Shake the reservoir to combine soap and water.
3. Position the Big Bite™ Valve below the reservoir and the drink tube exit port at the base by elevating the reservoir.
4. To allow solution to pass through the bite valve and into the drink tube, pinch the bite valve.
5. Rinse the reservoir and drink tube of the cleaning solution after washing.
6. Drain the entire volume of water. The reservoir is prepared for use.
7. Reservoirs should be air dried before storing to ensure that no moisture is left inside.
How Should I Wash My Plastic Eddy Or Chute Bottles?
Cleaning our bottles by hand or in the dishwasher is simple. The best way to wash each bottle is outlined in the following succinct list.
eddy, Groove and any other bottle with a Big Bite™ Valve:
- Bite valve and straw should be removed from the cap.
- By hand with warm, soapy water or in the top rack of the dishwasher, clean it.
- We do not advise forcing a bottle brush through the bite valve slit if you like to use one because it could tear the silicone.
- Pour some bleach or mild soap into a clean glass jar of water for a more thorough cleaning. Put the straw, cap, and bite valve into the mixture before securing the jar’s lid. Shake the mixture for 30 seconds, after which you should let the parts soak for 15 minutes. Rinse and shake dry.
Now, to re-insert the bite valve into the cap:
- The bite valve’s original attachment point, the stem collar, should be turned to the open position.
- Position the bite valve so that the finger tab faces the cap’s front.
- The stem collar should be firmly pressed against the bite valve.
- Put pressure on the straw to secure it to the bottom of the lid. Make sure the straw completely encloses the notches.
How Do I Clean My Water Bottle Made Of Stainless Steel?
Cleaning Vacuum Insulated Stainless Steel Vessels:
With a bottle brush, warm water, mild soap, and the stainless steel Chute, eddy, and KickBak vessels, cleaning is simple.
Cleaning Lids:
All bottle caps, spout caps, tethers, and bite valves can be cleaned either by hand with warm, soapy water or in the top rack of the dishwasher. Before washing the vessel, take off the cap, spout cap, tether, and bite valve.
Pour some bleach or mild soap into a clean glass jar of water for a more thorough cleaning. Place the straw, cap, and bite valve into the mixture before securing the jar’s lid. Shake the combination for 30 seconds, and then leave the components to soak for 15 minutes. Rinse and shake dry.
Are Camelbak Water Bottles And Other Drinking Vessels Dishwasher Safe?
The majority of the time, yes. Your CamelBak sports bottles, like the Podium and Podium Chill, should be hand washed (we advise using hot, soapy water and a bottle brush). These bottle caps can be placed on the top rack of the dishwasher.
Dishwasher safe drinking vessels include all other CamelBak plastic, stainless steel, and glassware. This includes any Tritan Renew-based products as well as Chute, Chute Mag, eddy, eddy+, kids’ bottles, Horizon Drinkware, MultiBev, Forge Flow, and Hot Cap. To prevent damage, just make sure to place the caps on the top rack. Additionally, disassemble your MultiBev bottle before placing it in the dishwasher when you’re washing it.
How Do I Clean The Bottle For The Eddy Kids?
The construction of the eddy kids’ bottle differs slightly from that of the eddy bottle for adults; for example, we made the bite valve more difficult to remove so as to prevent choking hazards.
To begin, take out the straw and one-piece bite valve for cleaning. It’s easy to do:
- First, unscrew the cap and pop out the straw
- On the underside of the cap, grab the pull tab on the bottom of the bite valve and pull it out in one motion
- The bottle and bite valve can then be washed in warm, soapy water or put on the top rack of your dishwasher.
To re-insert the bite valve into the cap:
- Push the bite valve through the opening after flipping the cap upside down. Ensure that the pull tab of the bite valve is pointing in the same direction as the bottle handle—that is, toward the middle of the cap.
- You can pull the bite valve into position once it has protruded through to the bottle’s top. If the bite valve has two tiny grooves on its side, you may have pulled it out a little too far; simply push it back in until the grooves are seated.
- After that, simply re-insert the straw into the bite valve until it is snug.
Please refrain from sterilizing the eddy kids bottle in a microwave or other appliance.
How To Clean A Camelbak With Vinegar
The instruction manual that follows matches the video I posted above on cleaning a Camelbak.
SUPPLIES NEEDED
- White Vinegar
- Hot Water
- Paper Towels / Clean Towels
Step 1 – RINSE CAMELBAK WITH WATER & VINEGAR SOLUTION (AND DRAIN)
Aim for a ratio of 6–10 parts hot water to 1 part white vinegar (or measure by eye). The mixture is typically measured out into about a tall cup.
After that, fill your Camelbak with the mixture, and tighten the lid. Swish the mixture around in your Camelbak for around five minutes. After that, drain the mixture through the Camelbak tube, making sure to clean it as well.).
Step 2 – RINSE WITH CLEAN WATER (AND DRAIN)
Since no one enjoys the taste of vinegar in their water, you’ll want to re-fill your Camelbak with only fresh water this time.
Recirculate it inside before draining it through your straw.
Step 3 – AIR DRY
Clean the interior of your hydration bladder with a paper towel or a fresh towel once you’re done cleaning it. Then, inside the bladder, place 2 folded paper towels (or small clean towels) to help support the bladder and allow airflow.
To hold it up even better for airflow, I frequently rest a large kitchen spoon or other utensil at the front (where the lid is).
Your straw should be disconnected from your Camelbak, drained, and allowed to air dry as well.
How To Clean A Water Bladder With Lemon Juice
Lemon juice is particularly helpful with neutralizing odors in your hydration bladder, should you start to notice your water bladder having a “funk” to it.
SUPPLIES NEEDED
- Lemon Juice
- Hot Water
- Paper Towels / Clean Towels
Step 1 – RINSE CAMELBAK WITH WATER & LEMON JUICE SOLUTION (AND DRAIN)
A liter of hot water and 1/4 cup of lemon juice are measured.
Once it’s been added, pour it into your Camelbak and tighten the lid. Stirring the mixture in your Camelbak should take about five minutes. For added cleaning, let the mixture sit for an additional 30 minutes.
Then, drain the mixture through the Camelbak tube, making sure to clean it as well.).
Step 2 – RINSE WITH CLEAN WATER (AND DRAIN)
Once more, we want to make sure to thoroughly rinse the solution out of the water reservoir, so you’ll want to refill your Camelbak once more, but this time with only fresh water.
Drain it through your straw after once more swooshing it around inside.
Step 3 – AIR DRY
When you’re finished, use a paper towel or clean towel to clean the interior of your hydration bladder. Then, to support the bladder and allow for airflow, place 2 bunched paper towels (or small clean towels) on the inside.
To hold it up even better for airflow, I frequently rest a big spoon or other kitchen implement at the front (where the lid is).
Straw should be disconnected from Camelbak, drained, and allowed to air-dry as well.
How To Clean A Hydration Bladder With Baking Soda
SUPPLIES NEEDED
- 2 Tablespoons Baking Soda
- Hot Water
- Paper Towels / Clean Towels
Step 1 – RINSE CAMELBAK WITH WATER & BAKING SODA SOLUTION (AND DRAIN)
With a few cups of hot water, combine two tablespoons of baking soda.
After that, fill your Camelbak with the mixture, and tighten the lid. Stirring the mixture in your Camelbak should take about five minutes. For added cleaning, let the mixture sit for an additional 30 minutes.
Drain the mixture out through the Camelbak tube after that, making sure to clean it as well.).
Step 2 – RINSE WITH CLEAN WATER (AND DRAIN)
You’ll need to refill your Camelbak once more, but this time with only fresh water because we want to make sure to thoroughly rinse the solution out of the water reservoir.
Drain it through your straw after once more swooshing it around inside.
Step 3 – AIR DRY
When you’re finished, use a paper towel or a clean towel to clean the interior of your hydration bladder. Then, inside the bladder, place 2 folded paper towels (or small clean towels) to help support the bladder and allow airflow.
To hold it up even better for airflow, I frequently place a large kitchen spoon or other utensil at the front (where the lid is).
Take your straw out of your Camelbak, drain it, and let this air-dry as well.
How Do I Clean My Bag?
Simply wipe it down with a damp cloth if your pack starts to get dusty. If it’s really filthy and needs a deeper cleaning, here’s what to do:
- With some mild soap, soak it in warm or cool water.
- Rinse it thoroughly under cool running water (skip this step and you might end up with suds the next time you perspire while wearing your pack).
- It can air dry by being hung up.
Aside from the washing machine, your pack can pretty much go wherever you go. Your pack’s straps, fasteners, and weatherproof coating could become twisted or torn if you wash it in a machine. Just be aware that it nullifies the Got Your Bak™ warranty if you choose to go against the rules and wash your pack anyhow.
After Every Use – Rinse, Drain, And Dry
After every use, especially if you’re filling it with something other than water, thoroughly rinse your water reservoir with hot water (and optional soap). The DRAIN and DRY are, in any case, the key words here. The sides of every reservoir on the market, whether it be made by Platypus Hydration, Camelbak, Osprey, or Deuter, stick and trap moisture, making it difficult to dry them.
My home has the ideal drying setup, including an oscillating towel rack (shown below; it cost about $15 at our neighborhood kitchen store) that works great for hanging my reservoir upside down. I prop open the top of my Deuter Streamer with the orange slider seal so that it dries the best, but I’ve also read about people doing the same thing with a Q-tip. Whatever method you decide to use, keep in mind that drying your reservoir is one of the most crucial actions you can take.
After 3 To 4 Uses – Deep Clean
Since it seems to be the most thorough and well-explained, I use Platypus’s suggested approach. Here are the steps:
1) Add ¼ cup baking soda to ¾ cup of water per liter volume of your reservoir and shake for 30 seconds
2) Add ¼ cup lemon juice, shake for 10 seconds, then vent by loosening cap away from face (note that adding lemon juice causes effervescence/pressure)
3) Repeat shake/vent 3 times
4) Expel as much air as possible and soak for 20 minutes
5) Rinse 3 times with hot water
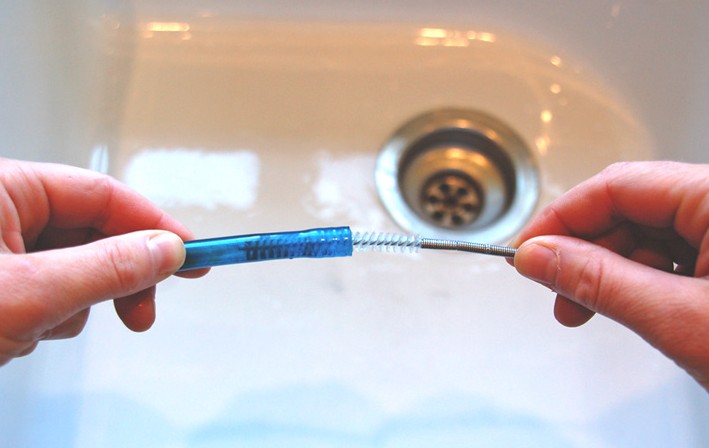
Brushing the inner surface, including the tube, should be part of the thorough cleaning. I use the CamelBak Cleaning Kit, which has brushes for the reservoir and tube. Simply take apart every component and scrub each one individually. To help remove all the baking soda residue, I use a brush AFTER applying the baking soda/lemon mixture.
A note about bite valves: To make it simpler to clean the entire tube when performing the deep clean and brushing, it is best to remove the bite valve. Though it’s a little challenging to remove from the tube. Do you know of a good approach?
When You See Mold – Disinfect
I have a reputation for forgetting my reservoir and leaving it in a dark pack for several days, sometimes even weeks. Sadly, this happened badly after I completed this year’s Great Ski Race. I didn’t bother rinsing and cleaning because I didn’t have any liquid left in the reservoir, but since I had been using an electrolyte mix during the race, it developed into a nasty case of mold.
If this occurs to you, you should disinfect your Camelbak or other reputable reservoir with the best equipment available. By eradicating microscopic organisms, disinfecting goes beyond general cleaning. The vast majority of experts advise using bleach or a chlorine-free substitute like these Cleaning Tablets or, hint-hint, Seventh Generation’s Free and Clear.
Here’s how to disinfect your Camelbak or another hydration reservoir:
1) Fill the bladder and hose with 1-oz of bleach per liter of warm water
2) Soak overnight
3) Rinse well with warm water and dry completely
Camelbak Care & Storing
Okay, so the best way to keep your Camelbak clean and free of debris and mold is to simply take good care of drying it out after a trip.
Bring it home after using it over the weekend, drain the water out of it, and give the inside a thorough cleaning. Allow your Camelbak to airdry after propping the interior open (as I demonstrate in the video above). Be sure to completely drain the water from the Camelbak tube and allow it to air dry as well.
Most of the time, you shouldn’t need to do much extra cleaning when you do this after trips. I really only “wash” mine every 3-6 months, especially if I’ve been using it quite a bit.
Many people advise folding your Camelbak and storing it in the refrigerator after you’ve finished drying it. Although I personally don’t do this, it is completely logical why it would be a fantastic additional method for avoiding the growth of mold inside your Camelbak.
Conclusion
While daily and weekly maintenance only requires a quick wash with water, it’s crucial to know how to clean a Camelbak thoroughly. The key is to scrub the reservoir and tube with brushes, pipe cleaners, and an agent like baking soda—two tablespoons are suggested—and let it sit for about 30 minutes.
As well as the interior of the port area where the tube attaches, make sure to scrub all of the tube’s seams and other components. Repeated rinsing and air drying come next.
Let us know in the comments if you have any advice on how to properly clean a Camelbak or other hydration bottles and reservoirs.