How To Adjust Bike Brakes? – Some Useful Methods
Russell Franklin - September 21, 2022
For cycling to be safe, brakes must be effective. Few tools and a short amount of time are needed to check and adjust them.
Over time, bicycle brakes lose some of their effectiveness. Pads gradually degrade while cables stretch. If the lever can be fully squeezed on without the brake engaging, immediate action is needed. You can view another article here if you are using disc brakes and are having problems.
Table of Contents
How To Adjust Bike Brakes
1. Centre Your Brakes
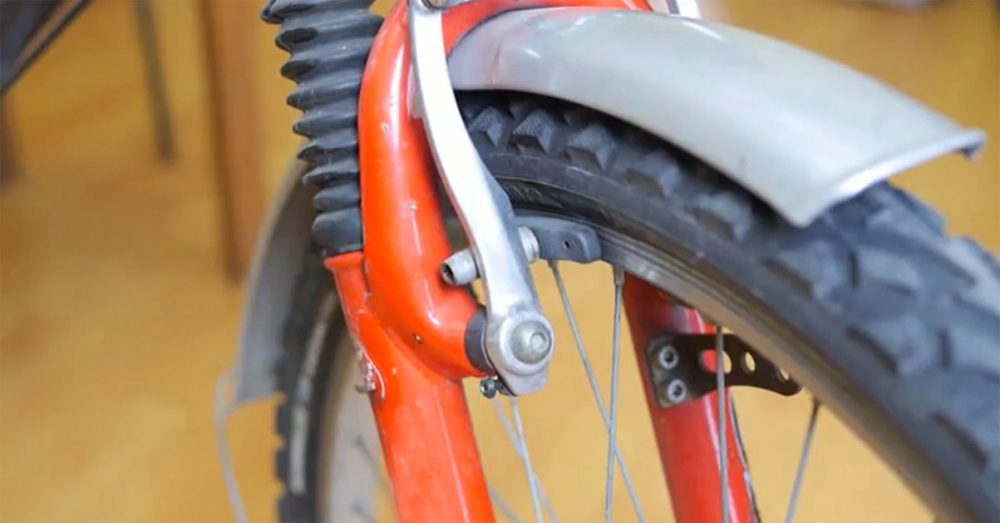
First and foremost, you must center your brakes. Are the brake pads spaced equally apart from the rim? If you can’t see it with your naked eye, apply pressure to the brake and watch to see if the brake pads make contact simultaneously or if one pad pushes the rim across to the other pad. Unscrew the back bolt, realign the brake, and then firmly tighten it to straighten it.
2. Check The Distance
The next step is to measure how far the pads are from the rim. There is no standard for how much of a gap to leave; some people prefer very firm brakes, while others prefer a little more travel on the lever. Loosen the bolt holding the cable and squeeze (or release) the brake calipers slightly while holding the brake caliper in one hand. Check how the brakes feel at the lever after retightening this bolt and securing the cable. Continue until the brake lever feels the way you want it to.
3. Tyre Clearance
The lever is shown in this position not to change the feel of the brakes but rather to provide room for the tire clearance when removing the wheel from the bike. Make sure the lever’s point is pointed downward rather than outward when riding and adjusting your brakes.
4. Align Brake Pads
Align the brake pads after you have made the necessary adjustments for cable tension and brake caliper position. To ensure that they are in the middle of the braking surface, place these there. They must never be lower than the braking surface and must never come into contact with the tire’s sidewall. Check the brake pads’ overall alignment with the braking track by rotating the wheel.
5. Barrel Adjuster
It’s simple to fine-tune down the track with the barrel adjuster, as shown in the large image above, once cable tension and pad position have been set up. The pads on this barrel can be moved in either direction: clockwise to move them farther from the rim, and counterclockwise to bring them closer. Additionally, this enables micro-adjustment from the saddle and is the best way to account for cable stretch over time without completely resetting cable tension.
Disc Brakes
The following is just one very easy, home-mechanic-friendly way to fix a typical issue with disc brakes, which are more difficult to adjust than cable or V-brakes. The majority of the time, a misaligned brake caliper or a wheel that was improperly reinstalled after removal is to blame for rubbing on your disc brake.
1. Before adjusting the brake itself, loosen the quick-release skewer, make sure the wheel is positioned correctly in the dropouts, and then firmly tighten the quick release. The disc brake itself is most likely to blame if the brake is still rubbing.
On the brake caliper, loosen the two bolts. Just enough undoing is required for the caliper to wiggle side to side when shaken with your hand, not all the way.
2. Retighten these bolts while firmly pressing the corresponding brake lever. The wheel ought to now spin easily. Try this process again if the pads are still audibly rubbing on the brake rotor all the way around; occasionally, it requires a few tries before the caliper settles into the proper position.
3. The caliper can also be adjusted by eye if step two is unsuccessful. A gap exists on either side of the rotor, as can be seen in the image. Realign the caliper manually with the bolts lose, and then, holding it firmly in place, tighten the bolts with the other hand.
V Brakes
1. The cable tension needs to be changed after making sure the wheel is centered and spinning freely. Release the brake cable while still holding the brake’s two arms in one hand.
2. As soon as the brake pads are approximately the right distance from the rim for the best braking, gradually let go of the pressure you’ve been applying to the brake arms. With your free hand, you might need to help the cable pass through the clamping point.
3. Bolt tightening after brake cable reassembly By pressing the lever, you can check to see if the brake lever travels as you prefer.
4. The pads should now be placed differently after the cable tension has been set. Squeeze the brake lever or the V-brake arms firmly into the rim to simulate braking to help with positioning on the rim. Using your free hand, align the brake pad so that it makes contact with the rim in the center of the braking track while it is still loose. Retighten the bolt once you are certain the pad isn’t positioned incorrectly or isn’t rubbing against the tire. Continue on the opposite side.
5. On one side, it’s clear, but it rubs on the other. The tiny screws that are located on either side of the brake can be used to adjust the brake. This screw regulates the tension of a metal spring that runs up the back of each brake arm. Wind this screw in to tighten the right spring and force the brake arm out if the right brake pad is rubbing. To get the pads to contact evenly and stop rubbing against the rim, keep making adjustments in this manner. Check how the brake feels when you squeeze it after you’re satisfied with the position of the pads, then repeat steps 1-3 to fine-tune the feel.
How To Adjust Your Disk Brake Pads
Disk brakes work similarly to v brakes in that when you apply the brakes, two pads squeeze against a moving part of the wheel to slow you down. This is the metal disk, or rotor, located in the middle of your wheel when using disc brakes.
Disk brake pads may deteriorate and misalign with the rotor over time. Worse still, worn brake pads are less obvious than those on v brakes and can be dangerous, so it’s critical to maintain them occasionally. Here’s how.
Stand Your Bike Upside Down On A Flat Surface
The wheel needs to be spun as part of the brake rotor adjustment procedure. So, to get ready for that, you should stand the bike upside-down so that its handlebars and saddle are supported.
You could also buy a bike stand or ask a friend to simply lift the bike when it’s time to spin the wheel.
If you intend to perform your own maintenance in the future, a bike stand might be a good idea.
Check The Alignment Of The Rotor
The rotor should be visible if you look down your wheel, where it is sandwiched between two brake pads inside the brake caliper. The caliper needs to be adjusted if there is an uneven gap on either side of the rotor.
It’s possible that from here, everything appears to be fine. Rotor damage or bending, however, can occasionally go undetected until the wheel is in motion. So, spin the wheel.
The rotor rotates with the wheel, so if it is bent, it should jiggle as it does so. In most cases, this means you need a new rotor, but you can true the rotor using a special tool that essentially lets you bend it back into shape.
If the wheel doesn’t move laterally when you spin it, you’ve successfully corrected the rotor.
Loosen Your Disk Brake Bolts
You’ll need to realign the caliper if your rotor appears to be closer to one brake pad than the other. You must first remove the bolts at the top and bottom of the caliper in order to fix this.
Make sure not to completely loosen them. You want their fittings to have just the right amount of slack so that they can move around a little bit without coming apart.
Squeeze The Brake And Tighten The Bolts
Spin the wheel after releasing the brake caliper before pulling the brake lever firmly.
Both pads will align with one another as the brake caliper clamps down on the rotor.
Retighten the bolts while the brake is still engaged.
Release The Brake Lever And Test
When you release the brake lever, it ought to rest halfway between the two brake pads inside the caliper. While it should be visible, make sure the caliper is still in place and there is no lateral movement by spinning the wheel.
Smaller adjustments can be made by loosening one bolt at a time and moving the caliper until they are evenly spaced.
Stay Safe While Cycling
Long-term bike protection will benefit from your understanding of how to adjust your bike’s brakes. Purchasing cycling insurance is another way to safeguard it.
With the help of our specialized cycling insurance, whether you’re at home or out riding, you’ll be protected against accidents and your bike and accessories will be protected from damage, theft, and loss. Find out what we can do for you by requesting a free online quote right now.
After making any necessary adjustments, apply the brakes firmly a few times before performing the brake test again. Go to the bike shop if you’re still not satisfied.