How To Remove Bike Chain And Replace It?
Jane Tu - November 16, 2022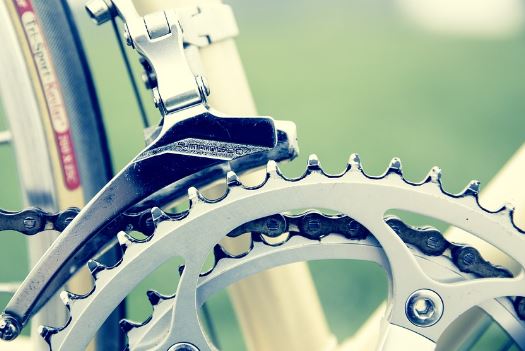
How to remove the bike chain? If you need to replace your chain or clean your bike chain, you might need to take it off. We demonstrate how to do this simply whether your chain is connected by a quick link, or if it is a standard chain with pins. We introduce a step-by-step guide to help you remove the bike chain smoothly.
Table of Contents
What are Bike Chain Parts and Tools?
Chain wear tool: A typical chain wear tool inserts its other end into the space between two rollers while hooking over one roller (or pin) in your chain. The chain’s wear level and whether it needs to be replaced are indicated by numbers on the tool.
New chain: Bike chains are specific to speed. So, for instance, if you have a 9-speed bike, get a 9-speed chain. Higher-end chains have anti-rust coatings or are made of stainless steel rather than ordinary steel.
Replacement Pin or Master Link: To join the two ends of the chain together, new chains will either have a new pin or a unique link known as a master link. Replacement pins or master links can be purchased separately if you’re repairing an existing chain; they should work with the speed and brand of your chain.
Chain tool: If you have a bike chain with standard links, you will need a compatible chain tool that allows you to easily remove an old pin and insert a new one when breaking and reconnecting your chain.
Master link pliers: These pliers make it easier to disconnect and reconnect the master link if your chain has one, and if it does, you’ll appreciate them.
How To Determining New Bike Chain Length?
A new bike chain will typically need to be shortened by removing links if it comes from the factory too long for your drivetrain. There are a few approaches to take.
Laying your new bike chain down next to your old chain is the best and simplest way to measure its length. Once you’ve shortened your new chain to match the length of the old, count the links again to be sure.
The chain can also be draped over the large chainring in front and the large cog in the back by passing it through the front derailleur. The rear derailleur should not be engaged just yet with the chain. Pull the chain’s two ends tightly together. The chain should be two full links (or one inch) longer than it is at its meeting point.) of overlap (you will have an additional half link at the end where you will connect the chain).
(Note: Many full-suspension mountain bikes use a design that moves the rear axle further away from the bottom bracket as the bike cycles through its suspension; this is known as “chain growth.” When using the aforementioned technique, you will need to completely compress the rear suspension to account for this chain growth.)
Make sure the two remaining ends of the chain will connect to one another before removing the extra links. A chain can only be joined by connecting the outer plate of one link to the inner plate of the connecting link. Utilizing a chain tool, eliminate the extra links.
How to Remove Bike Chain and Replace It?
Here are three methods to remove and replace bike chains as follows.
Method One: Removing a Regular Bike Chain
Get a chain tool. A chain tool is a tiny, hand-held device with a rotating handle and a metal pin that forces the rivet out of a chain link to cause the link to separate. Online or at your neighborhood bike shop, you can purchase a chain tool.
Put the pin in the chain tool from one of the links on your bike chain. The chain tool ought to have two prongs that can fit around a link in your bike chain (next to the tiny metal pin). To ensure it is firmly in place, slide the link between the two prongs. In the openings on either side of the link, the prongs should fit.
- There will be rollers, pins, outer plates, and inner plates on your bicycle chain. The chain will disintegrate when you use your chain tool to force the pin out of the rollers. Your chain tool should only be inserted into the pins of the chain; otherwise, you risk damaging the bike chain.
The pin must be inserted into the link by turning the bike chain tool’s handle in a clockwise direction. The center of the chain link should make contact with the pin. Keep turning the handle in a clockwise direction after it does. Verify that the tool hasn’t come off the pin despite possible resistance. The rivet, which is the pin in the center of the chain link, should be protruding from the opposite side of the link as you turn the handle. Stop turning the handle when the rivet is nearly completely free of the link because it is nearly impossible to replace the pin once it has fallen out.
- Because it’s extremely unlikely that you’ll be able to get your pin back into the link, take great care to keep it from coming out completely. If you do manage to completely remove your pin by accident, you can try removing that link and cutting your chain to the following undamaged link. But this might make it challenging for you to change into certain gears. Going to a bike shop to inquire about getting a new pin for your chain or to have the chain replaced is an additional choice.
- Your chain tool may slide occasionally, causing it to not be directly over the pin. You won’t just struggle to get the chain tool to push out the pin; it could also break the chain by distorting the outer link.
To remove the chain tool pin from the link, counterclockwise-turn the handle. The pin needs to be completely removed from the link. Once you are able to remove your bike chain from the chain tool, stop turning the handle.
To pull the link apart, remove your chain from the chain tool. The link should easily separate now that the rivet is almost completely pushed out from the attachment. The link will eventually come apart if you grasp the bike chain with your fingers on either side of the link and wiggle it back and forth.
- To avoid accidentally deforming the link, exercise extreme caution. You’ll need to replace the chain if it becomes twisted or damaged.
From your bicycle, remove the bike chain. You can remove your chain from the sprockets and lift it off of your bike now that it has been broken at one of the links. Utilizing the chain tool, reattach the rivet to the broken link when you’re ready to reattach your chain.
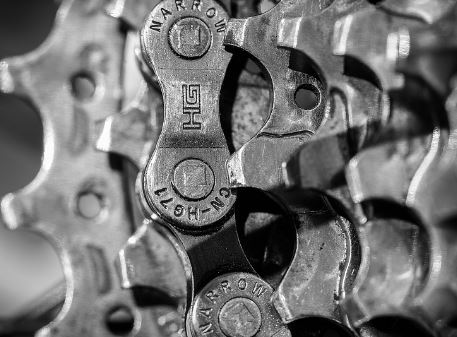
Method Two: Taking Off a Master Bike Chain
Your bike chain’s master link can be found there. Unlike the other links in the chain, master links typically have a unique appearance. Look for a link with different side coloring or one with pins (the circular metal pins in the center of the links) that are unique from the others. There might be an arrow on your master link as well.
- On contemporary, multi-speed bikes, master link chains are the most prevalent type of chain.
The master link should be compressed together using master link pliers. To fit in the grooves of a bike chain link, master link pliers were created. Place the pliers so that the two jaws are on the sides of the master link’s gaps. The master link needs to be situated between the pliers’ jaws. Squeeze the handle of the pliers to close the jaws and push the master link together once it is in place.
- Master link pliers are available at your neighborhood bike shop or online.
- It might be more challenging than using master link pliers if you try to squeeze the master link together with needle-nose pliers.
The master link can be separated by releasing the pliers. Pull the pliers’ jaws away from the master link’s sides. The master link should be separate.
Take the chain off your bicycle. Pull your bike’s chain carefully up and off the sprockets. Now that the master link is broken, it ought to be simple to remove. Reattach the rivets at the chain’s ends and secure the master link using the master link pliers to put the chain back on.
Method three: Removing a Split Bike Chain
Search your chain for the split link. The split link will be visually distinct from the other links in your chain. Be on the lookout for the link with the metal side plate that has been cut out in the center.
- Single-speed bicycles like children’s bikes and beach cruisers typically use split-link chains.
The split link’s metal plate can be released by using a pair of needle nose pliers. The split link’s left rivet should have one of the pliers’ jaws on its right side. The other jaw should be placed on the metal plate’s left edge, in the center of the cutout. To make the pliers’ jaws come together, gently squeeze the handle. You ought to notice the metal plate shifting to the right as the jaws close and hear a click as they do so.
- A spring-loaded clip may be triggered if too much force is used to try to release the metal plate, which could cause the bike to shoot off. Your spring-loaded clip might need to be replaced if this occurs. A replacement can be found online or at a nearby bike shop.
From the split link, remove the metal plate. It ought to be simple to slide off the rivets in the link once you’ve released it with the pliers. If you’re having trouble, use the pliers to aid in sliding it off. To prevent losing the metal plate, place it someplace secure, such as in a plastic bag.
For the chain to be separated, remove the second metal plate on the front of the link. This is the solid plate that was situated beneath the plate you just removed. You can remove the metal plate from the split link’s rivets by sliding it off with your fingers. Put the metal plate next to the other one for storage. Your bike chain ought to split apart once the second plate is removed.
Remove your bike’s chain by lifting your bike. Lifting it up and away from your bike after removing it from the sprockets. Reattach the split link to the two metal plates you removed when you’re ready to put your chain back on.
How to Check a Bike Chain?
Use a chain-wear tool to check your bike chain for excessive stretching. One end should be hooked over a roller (or pin) in your chain. Either the other end will rest on top of the chain or you will be able to fit it into the gap between the two rollers. If it lands in the space between the rollers, your chain is stretched and needs to be changed.
Tools for measuring chain wear have stamped-in numbers that show how worn your chain is. Replace your chain if the reading is between 0.5 and 0.75. If the reading is 0.75 or higher, you should replace your chain as well as check the condition of your cassette and chainrings to see if the stretched chain has worn these components out excessively.
Measuring the chain with a ruler or tape measure is another way to look for chain stretch. A brand-new chain will have exactly 12 full links that are 12 inches long (measured from pin to pin). You must change the chain if the 12 links are 12 1/8 inches or longer.
Now, do you grasp the ways to remove the bike chain and replace it?