How To Remove Bike Pedals?- Some Important Methods
Russell Franklin - September 21, 2022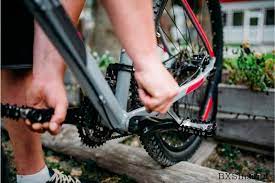
You would imagine that removing your pedals would be easy. However, those who follow the nearly always accurate adage “lefty-loosey, righty-tighty” will run into trouble.
This is due to the fact that the threads on each crank rotate in different directions. This is because if they turned in the same direction, the momentum of your spinning legs could act to gradually unscrew the pedal on the left-hand crank.
To counteract this, the lefthand crank arm on the non-drive side is always left-hand or reverse threaded while the righthand drive-side crank arm is typically right-hand threaded.
Happily, once you are aware of this important fact, using our advice will make taking out your pedals a breeze. If you’re having issues, try spraying penetrating oil on the back of the treads. Otherwise, use our guide to get started.
Table of Contents
Why Is It Important To Be Able To Change Your Pedals?
Changing or installing pedals is a simple process, but you want to make sure you do it correctly because a bike is useless without them. While changing pedals may not be necessary very often for some people, it is a skill that should be mastered if you frequently travel with your bike or switch pedals between bikes.
What You Need
- pedal spanner or wrench: Speciality tool for taking pedals off
- 8mm or 6mm Allen or Hex Key
- 15mm wrench or spanner
- Lubrication/grease
Removing The Pedals From The Non-drive Side
Pedal Wrench: The “Wrench Flat” area of the pedal spindle can be accessed from outside the crank arm if you’re using a Pedal Wrench to remove your pedals. First, mount the Pedal Wrench onto the pedal spindle with the crank arm at 9 o’clock and the Pedal Wrench at 3 o’clock. In order to loosen the pedal, keep it still while applying pressure to the wrench in an anticlockwise direction.
Allen Key: You must access the Hex fitting from the inside of the crank arm if you plan to remove your pedals with an Allen key. In order to use the long arm of the Allen Key to create leverage, start by inserting the short arm of the Allen Key into the Hex fitting.
Fix the Allen Key in place with the crank arm at 6 o’clock (pointing at the ground) and the Allen Key at 3 o’clock (pointing at the rear of the bike) at a 90-degree angle to the crank arm. When the pedal doesn’t budge, continue to hold it still while turning the Allen Key clockwise.
Removing The Pedals From The Drive Side
Pedal Wrench: Using a Pedal Wrench on the Drive Side is the same procedure as above. Beginning with the crank arm at nine o’clock (facing the front of the bike) and the Pedal Wrench at three o’clock (facing the back of the bike), attach the Pedal Wrench to the pedal spindle. Holding the pedal still, turn the wrench counterclockwise while applying pressure to the handle until the pedal releases.
Allen Key: The Drive Side pedals are removed using the same technique, but this time in an anticlockwise direction. Fix the Allen Key in place with the crank arm at 6 o’clock (pointing down) and the Allen Key at 3 o’clock. Holding the pedal still, turn the Allen Key counterclockwise until the pedal comes loose.
How To Remove Bicycle Pedals?
1. Protect Your Knuckles
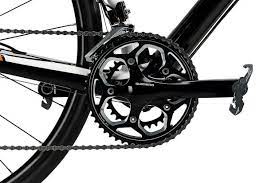
Start by moving your chain onto the big ring, which reduces the risk of knuckle injuries from chainring slips.
This is one of those rare jobs where having the bike upright on the ground rather than suspended in a bike stand makes it easier to complete.
2. To The Left
Put the crank in the three o’clock position, starting on the drive side, so that it faces forward and is parallel to the ground. A back Allen key can be used to tighten most pedals. If not, you’ll need a 15mm thin spanner. Often, an adjustable or conventional spanner will be too wide for this and you will need a special pedal spanner.
Insert the Allen key so that it is below the crank if you’re using one. Push downward and forward while rotating counterclockwise. You can exert a force that is reasonable. Use the same angles as you would if you were using a spanner.
3. To The Right
Put the crank in the nine o’clock position and switch to the other side. Push the Allen key down and forward again, then repeat the previous steps. The pedal will rotate counterclockwise this time. The pedal should then be spun off.
Keep any washers that fall out; you’ll need them to install your new pedals.
4. Clean Up And Inspect
Check for signs of damage by quickly wiping down the threads on the axle and inside the end of the crank. Your nearby bike shop can save the day by using a tapping tool if they appear worn.
This is usually only a cause for concern if removing the pedals was challenging.
5. Squeeze Of Grease
If you’re satisfied with how your axle threads look, add a quick squeeze of grease or anti-seize.
This should prevent them from squeaking while you pedal and should ensure that the next time you go to take them off, they will do so without too much resistance.
Preparation Of Change Bike Pedals
1. Pedal Inspection
Figure out which pedal is which first. This is simple when using Look or Shimano SPD-SL pedals because the rounded portion goes in front and the blunt end goes in the back. The axles will be labeled left and right on Speedplay, SPD-style MTB, or Crankbrothers pedals.
This is significant because, in contrast to the left (non-drive-side) pedal, the right (drive-side) pedal threads clockwise.
2. Grease And Preparation
In order to facilitate easy screwing in and out, grease the threads after installing the crank protection washers onto the pedal axle.
Starting with the pedal on the right-hand drive side, carefully thread the pedal into the crank by rotating the axle counterclockwise. This prevents the pedals from slipping as you pedal if you’re standing with your back to the bike and looking at it from the drive side.
3. Avoid Crossthreading
Make sure the thread is going in straight by checking it from all sides as it is being connected. Now take your spanner or Allen key and place it very firmly onto the spanner flats or into the socket. You don’t want it to slip since you’ll be applying a lot of torque to it.
4. Tighten The Pedals
The pedal should now be tightened until the crank arm and axle flange are tightly in contact. It will naturally tighten a little as you pedal, so there’s no need to crank it up extremely tight. Check the axle alignment from all sides if you discover that the threads are beginning to stick or tighten before the pedal is fully engaged. The threads in the crank may be harmed if that’s okay. By inserting the pedal from the inboard side of the cranks, you can occasionally “chase them through” and get them working smoothly once more. But if the threads are too badly harmed, it’s time for a new crank.
Assuming the first pedal fits correctly, proceed to tighten the offside pedal while keeping in mind to tighten it counterclockwise. You can now move forward.
5. Removing The Pedals
Even though removing a pedal appears straightforward, there are some tips that can be very useful. First, keep in mind that the pedals on the drive side loosen counterclockwise, while the pedals on the offside loosen clockwise. Double-check to make sure the tool you’re using fits the pedal securely and is of good quality. If you accidentally punch the chainrings, however, a slip could harm the tool, the pedal, and even your knuckles.
6. Gently Apply Force
We frequently position the crank at 5 o’clock, the tool at 3 o’clock, and then delicately use a foot to apply the pressure due to the need for considerable force and the desire to avoid a chainring punch. To avoid the soles slipping, avoid doing that while wearing road bike shoes.
Give the pedals a thorough cleaning while you have them out. To make sure the bearings are still spinning smoothly and aren’t tight or wobbly, grab the pedal axles and waggle them around. Cleaning your cleats while examining them for wear will ensure that everything functions properly when you reinstall them.
There are many justifications for replacing your pedals, including upgrading to nicer ones or mending broken ones. Alternatively, perhaps you want to go from flats to clipless or vice versa.