How To Use a Bike Pump – Step By Step Guide
Russell Franklin - October 28, 2022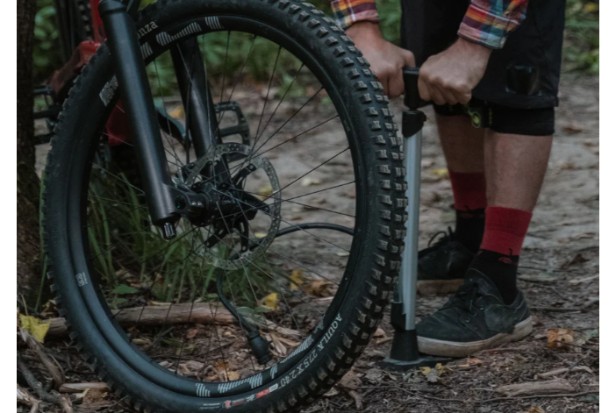
Bike pumps were not necessary when the first cyclists (velocipedes at the time) rode on iron bands or penny-farthings with solid rubber tires prior to the development of pneumatic tires.
However, as you might imagine, it wasn’t the most comfortable experience to be riding up and down the poorly cobbled streets on rock solid tires.
The first pneumatic tire, created by John Boyd Dunlop in 1887, was the precursor to the bicycle pump.
The rattling of John’s son Johnnie’s trike tires against Belfast’s harsh streets gave him headaches, he complained. John began working on making a more comfortable tire for his son to ride after learning how rubber functions.
Although the first bike tire pump was crude, many contemporary bike pumps share its structure and mode of operation.
Since their introduction, a wide variety of bike pump models have entered the market, each with a slightly different function.
As I describe each type of bike pump below, I’ll also point out any advantages and disadvantages that may apply.
Table of Contents
Bike Pump Types
Floor/track/stand Pump
Pros
- Easy inflation to high pressures
- Pressure gauge for accurate inflation
- Stable during inflation
- Works with Shcrader & Presta valves
Cons
- Non-portable
- More expensive than most other pump types
One of the most popular styles of bike pumps is the floor pump, also referred to as a track or stand pump, and for good reason.
As you can probably guess, floor pumps are devices that rest on the ground and have a foot platform for users to stand on to stabilize the pump while it is in use.
Large handles that are parallel to the ground are used to operate floor pumps.
The user connects the pump’s hose to the valve on their bicycle tire before inflating it. The hose is typically locked in place with a small lever, which seals the pump around the valve.
Once the hose is connected to the valve, the user pulls the handle up to draw air into the pump before pushing the handle back down into the pump’s body to force the air into the bike tire.
Since a track pump’s long, flexible hose keeps your bike from becoming unsteady while inflating the tire, using one is much less awkward than using a micro or frame pump.
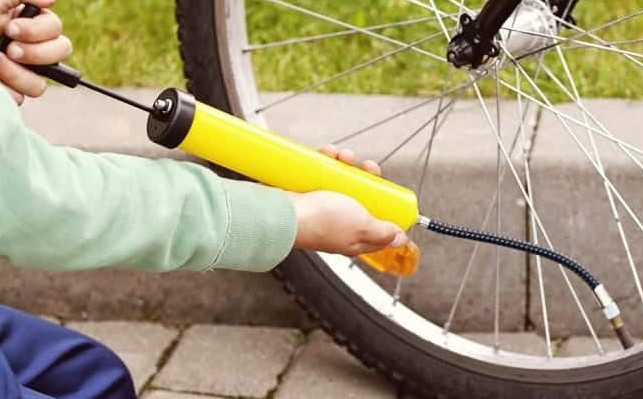
Mini/micro/hand Pump
Pros
- Highly portable
- Normally supplied with frame mount
- Great for roadside repairs
Cons
- Requires many strokes to inflate a tire
- Don’t usually feature a pressure gauge
- More fiddly to use than a track or frame pump
Micro bike pumps, also known as mini bike pumps, are excellent for carrying around when you’re on the go.
However, the majority of them come with a frame mount that typically fastens to your bottle cage screws. A micro bike pump will fit easily into your backpack or jersey pocket.
Most contemporary mini bike pumps are tubed, which means that when not in use, a small detachable hose is stored inside the pump.
Integral pumps, on the other hand, are more difficult to use and can be found in some older or less expensive mini tire pumps.
Furthermore, if you don’t take care when pumping your bike tire, it’s simple to bend or damage your valve.
Frame Pump
Pros
- Faster inflation than mini & micro bike pumps
- Less fiddly than micro pumps
- Can be easily mounted to bike’s frame
- Suitable for portable use despite size
Cons
- Heavier and bulkier than micro pumps and CO2 inflators
- Occupy a large amount of space on your bike’s frame
- More expensive than micro pumps
Frame pumps, which are mounted on the frame of your bicycle, are essentially a bigger version of micro bike pumps.
Some frame pumps have a spring-loaded end that rests against the head tube and a flexible end that rests on the seat tube, and they fit snugly underneath your top tube.
Those frame pumps that aren’t spring-loaded will typically come with a frame mount. Remember that frame pumps are fairly long and might not work with some bikes, like full-suspension mountain bikes.
What Psi Should Bicycle Tires Be At?
The manufacturer’s recommended PSI (pounds per square inch) range is printed on the sidewalls of your tires. The ranges of bicycle tires vary, and narrow tires require more pressure than wide tires. The recommended PSI for different tires are:
- Road bike tires: 80–130 psi
- Mountain bike tires: 25–35 psi
- Hybrid tires: 40–70 psi
Bicyclists with experience can frequently determine whether their tires require pumping by pinching the tire between their thumb and forefinger. Using a pressure gauge to check the tire’s air pressure will give you a more accurate idea of when to pump it; if the air pressure is below the recommended PSI, pumping is necessary.
First, inflate your bike tire to the middle of the recommended PSI range. You must also consider your body weight. More PSI is required for tires that support a heavier rider. You’ll need to experiment with different PSIs to find the one that feels most comfortable to you because weather and terrain can also have an impact on how a bike rides.
Why Do I Need To Blot Air From My Bicycle Tires?
The bone-jarring “ride-quality” of solid wheels was the reason pneumatic tires were developed.
Your suspension is provided by the air inside, which also enables the tyre to adapt to the surface for better traction and grip.
You can easily increase how much you enjoy riding by quickly inflating your tires. Your bike will ride differently if you have the wrong tire pressure set, and it may also be more prone to punctures.
How Well Does My Tire Retain Air?
If you’ve never fixed a puncture, you might not have given much thought to how your tires retain air inside.
A bicycle’s inner tube is used by the vast majority of bikes. This is an airtight tube with a doughnut shape that is located inside the tire and has an external valve for inflating it.
The tyre’s ability to grip the ground and protect against punctures depends on the tube’s ability to inflate it.
You may be familiar with tubeless tires, which do away with tubes in favor of a special rim and tire combination that seals air without the use of tubes. These typically need tubeless sealant inside, a liquid that seals off any openings where air can escape.
Although road bikes are catching up to mountain bikes in terms of popularity, tubeless tyres are still more popular in the former.
Since there is no tube, there is a much lower risk of pinch flats, which happen when your inner tube is pinched by the rim and punctures. The tubeless sealant also plugs punctures. Therefore, for better comfort, speed, and traction, tubeless tires can be operated at lower pressures than those with an inner tube setup.
Also available at the very top end are tubular tires. Although they are essentially just a tyre with the tube sewed into it, these are hardly ever seen or used outside of professional racing.
Why Is My Tyre Flat?
Your tyre is probably flat for one of two reasons. Your tire has either developed a puncture or simply lost air over time.
We’ve put together a thorough guide on how to fix a puncture if you have one.
A traditional kit is a flexible choice when you have a little more time, while glueless patches are great for a quick fix.
Because tubes aren’t completely airtight, all tire systems will gradually lose air. In contrast to lightweight latex tubes, which leak relatively more quickly, standard butyl tubes hold air reasonably well. Even tubeless systems slowly release air.
Older tubes leak more air than new ones do, so if you haven’t changed yours in a while, it might be time to check them out. The valve may no longer be properly sealing, which is a less likely but still possible scenario (especially with older tubes).
Try pumping up the tire to see if that helps you figure out what’s wrong. You probably don’t need to do anything else if it can hold air. It’s possible that you have a puncture if it doesn’t.
If it slowly leaks air over night, you either have a slow puncture or an outdated tube that needs to be replaced.
Conclusion
Particularly after extended use, tires have a tendency to lose air. Fortunately, it is possible to purchase a bike pump and manually inflate your tires. Even though using a bike pump is easy and appears straightforward, if you use one incorrectly, you risk seriously damaging your bike’s tires.
To help you successfully use a bike pump, we have put together this guide. We also keep the procedures straightforward and simple to follow. However, we hope you can inflate your tires on your own with the help of this guide.
Therefore, feel free to share this instruction on using a bike pump with everyone if you found it useful. You can leave a comment below with any queries or recommendations you might have for our discussion.